
One idea that I had was an R2-D2 cake. My mom had made my brother one in the early 80s. You start with a 13x9 cake and round the corners of one short end to make the dome and use those for feet at the bottom. Frost in white icing and add decorations (mostly blue), to match R2-D2
 However, when I searched Pinterest, I found Light Saber Cakes. I was intrigued. Even better, I could combine my daughter's requested brownies into the cake as the handles for the lightsabers.
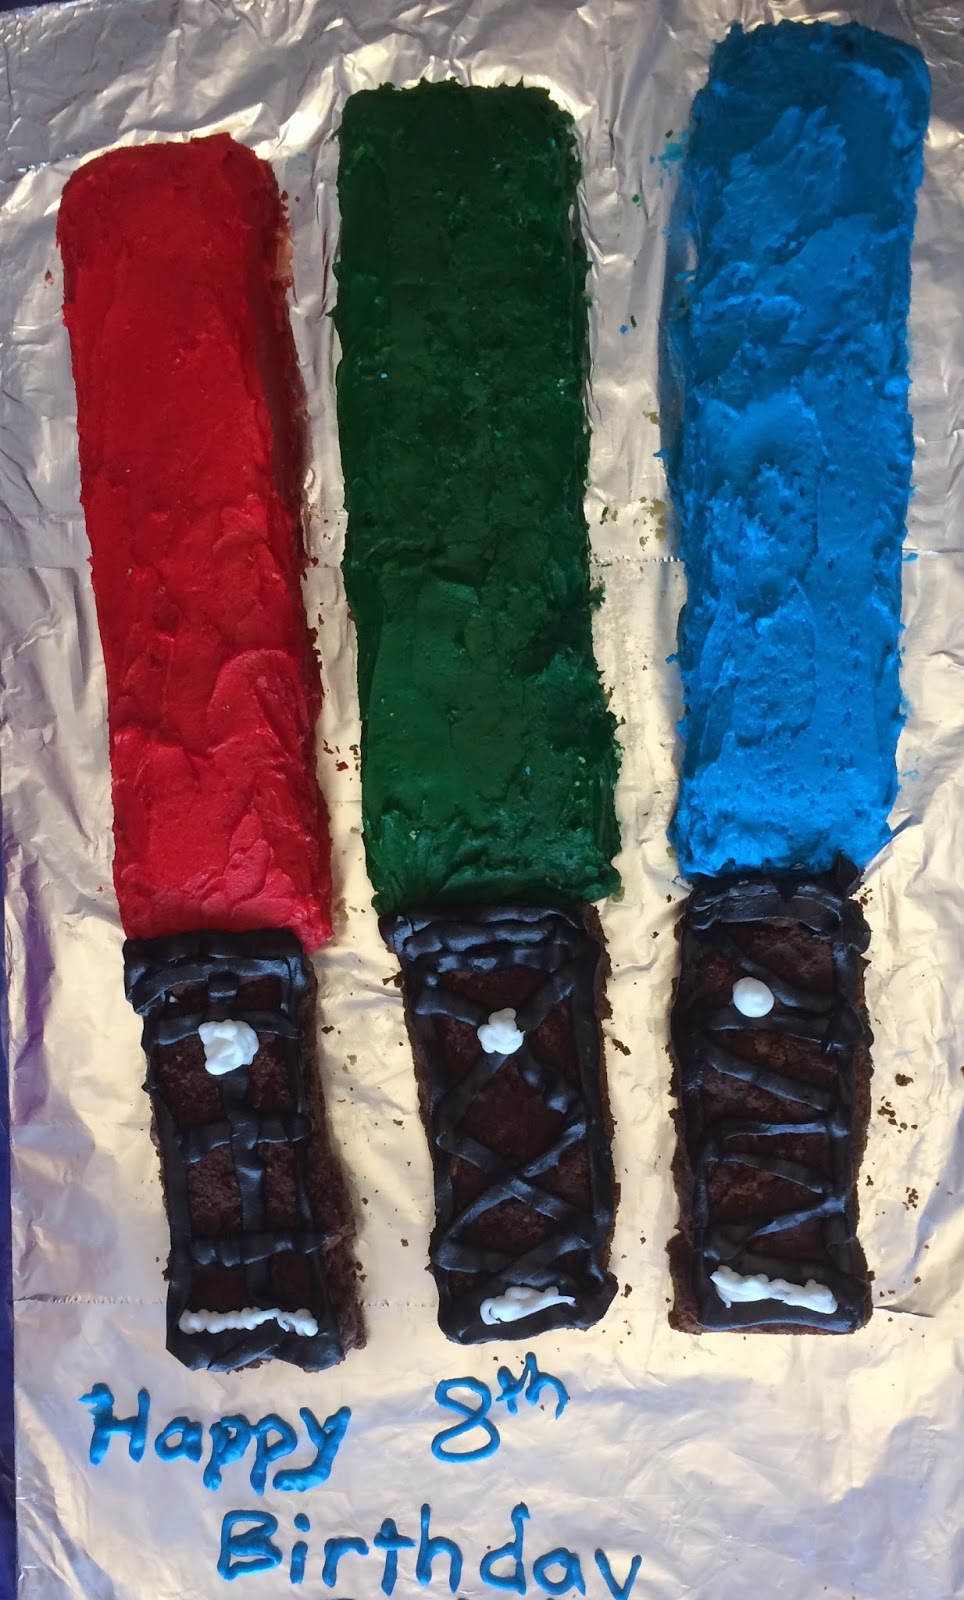
To start, I baked a 13x9 sheet cake and a 9x9 brownies. I used a box cake mix for the cake and my homemade brownie recipe. When making your brownies, make sure you use a recipe that is sized for a 9x9 pan. I used my 13x9 recipe and it did not bake well in the 9x9 pan. Next time, I would either use a box mix for a 9x9 pan or make a 13x9 pan and not use all of the brownies in the light sabers.
Once your cake and brownies are baked, allow them to cool completely. Select your light saber colors (my daughter chose red, blue, and green). I asked about a purple for Mace Windu, but she wanted the red, blue, and green.
Slide your 13x9 cake into 3 strips that are 13" long and approximately 3" wide each. These will be the blades of your light sabers. Slice the brownies into 3 strips that are 3" wide and 9" long. These will be the hilts of the lightsabers.
You will need to find a long board to hold your cakes (each light saber is ~22" long). I have a panel scrap from our family room built in that is the perfect length. I cover it in wax paper and two layers of foil. You could also use sturdy cardboard as your base.
Prepare your icing. I used homemade buttercream icing following the Domino Sugar recipe (made a batch and a half). However, any white based icing including store-bought would work. I split my icing into 3 equal amounts (light saber blades) and two smaller amounts (black and white). To dye my icing, I purchased the Wilton gel colors in red, green, and black. I used standard food coloring for the blue. The gel coloring will allow you to obtain more vibrant colors without using so much food coloring that you alter the taste and consistency of your icing. (Tip: Use the black very sparingly.)
Frost each cake section (tip: Freeze the cake sections for up to 30 minutes to reduce crumbling of the cut edges as you ice them). I find it easiest to frost one side and the top before placing them in position on the board. For the two that have a non-cut edge, I find it easiest for this to be the last side to frost as it does not crumble as much.
Place the brownies on the board. Use a small amount of icing under the brownie to anchor them in place. When I looked at my daughter's light sabers I noticed they all had different designs on the hilt, so I used a variety of Xs, stripes, etc in black. I also used a little bit of white at the base and to form the button.
Finally, I added "Happy 8th Birthday" in icing writing on the board below the light sabers. Trust me, this is why you want your brownies anchored...I didn't anchor them with icing and they slid into my writing as soon as I moved the cake. Fortunately I moved it right away and still had icing to redo the writing.
The cake was a big hit! The kids who prefer cake got cake, those who preferred brownies got brownies. With 13 kids and some parents, the cake was almost completely gone. It is a good thing that I had both the cake and brownie. Having the cake width already cut in thirds, it was very easy to cut the cake at the party.